** Disclaimer to all new readers – This blog post is VERY old and not really representative of my current work. I’ve just left it up here for historical purposes. If you are interested in learning more about packet analysis I’d reccommend reading some of my newer posts or looking at my book, Practical Packet Analysis. **
Over the course of the next few weeks I am going to be putting out a series on network traffic analysis. This is one of the most important skills any network administrator can have and is absolutely crucial to solving a variety of network related problems.
We won’t get into any actual packet analysis in the introductory article We will, however, go ahead and make sure we have the appropriate software to proceed, along with a brief understanding of how it works and how to use it.
Getting Equipped
The software we will be using for this series is the ever popular Ethereal network sniffing application. This program is distributed freely and can be downloaded at http://www.ethereal.com. Installing this software is simple enough that I am not going to go through it here, although it is important to note that this software relies on the WinPcap driver which is included in the installation package. As a lot of you may already know, there have been some issues with WinPcap and version skew, as in different versions of the driver being required for different pieces of software to work with it. This being the case, I reccomend you to install the version of WinPcap that comes with Ethereal even if you already have a version of this driver installed. This will help to prevent any possible issues in the future.
There is no actual hardware required for doing this type of analysis, however, it makes things a LOT easier if you have an old 10/100 hub lying around. I will explain why this is here very shortly.
Ethereal Basics
Once you have installed Ethereal along with the WinPcap driver you should be ready to dive in head first. The first thing we are going to do is a simple packet capture. To do this you will first need to select your capture interface by clicking the “List avaliable capture interfaces” button to the far left hand side of the main toolbar.

Once you have done this you will be presented with a window listing all avaliable capture interfaces. Clicking the “Capture” button next to the interface you wish to use will begin capturing packets from this connection.
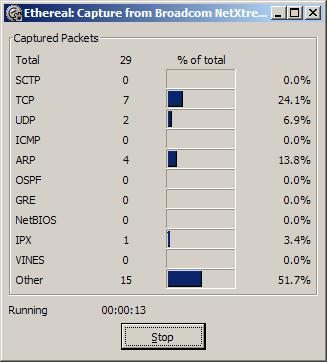
Wait for a few minutes until a significant amount of packets have been collected and then click the “Stop” button. You should the be returned back to the main screen with a whole bunch of new data. Congratulations! You have just completed your first successful packet capture!
Slipping On To the Wire
Now that you know how to do a basic packet capture in Ethereal it is important to learn how to capture the right traffic. Assuming you are on a switched ethernet network (which most everybody is these days), all of the traffic you just captured was your own. That is, all traffic was either coming to or going from the computer from which you intiated the packet capture. This is basically how a switched network functions. The switch only sends data to those ports in which it is destined. This brings up the question of how do you capture traffic from a computer that packet sniffing software is not installed on?
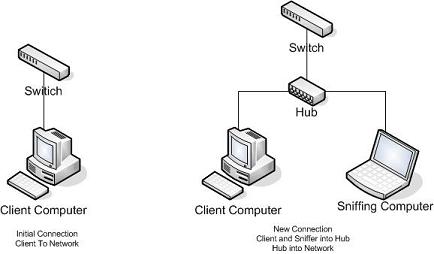
Remember earlier when I told you that it would come in handy to have an old 10/100 hub lying around? Well this is that time. I am not going to go into great detail on the differences between a switched and a hub network, but put simply, in a hub network every piece of data is sent to every single port. The hub uses a lower level of logic in that it does not know where data is supposed to go, so it sends it to every client on every port and lets those clients accept it if they want it and deny it if they don’t. This means on a hub network when you sniff packets you are seeing the packets of the entire network. So lets say you are trying to troubleshoot a computer on a switched network. What you will want to do is go to the client computer and unplug it from the network, and plug it into your hub, along with the computer you will be using to sniff the traffic. From here you will plug the hub onto the network using its uplink port. This will effectively put the two comptuers you will be using onto a hub network allowing you to read all the traffic you need to. See the diagram below for a visual explanation of the hub setup.
Homework
In the next section of this series we will look at some basic packet structure as well as some more features of Ethereal. We will also look into some basic troubleshooting using packet analysis. Between now and then I would highly reccomend playing around with Ethereal and looking at your own networks packets to see if you can try and figure out what some of them are.
7/5/06 – If you like this series, digg it!
**UPDATE**
Enjoy Packets School 101? Check out Packet School 201!

As a lot of you may already know, Microsoft introduced several new online courses and issued certificates after successful completion of the programs. You can find various courses like 70-293, that enable you to solve concurrent problems and also 70-294, that will increase your proficiency. Online guides and CDs for Ms 70-296 certifications are also available for students’ assistance.

I am definitely interested in learning the basics of using Ethereal to determine network issues. Thanks.
Yeah. Ethereal is among the most powerful packet sniffer out there, and apart from being great, it’s free and easy to use. (Easier then TCPDump in any case :)). You can’t get much better then that.
If you don’t run Linux/UNIX, I personally suggest that you find an ISO of a Linux live CD that contains Ethereal. Hackin9 (based on Gentoo) and Knoppix STD spring to mind.
Trying to use Windows to diagnose network issues is really quite a humourous notion.
In response to Wily,
Linux is definitely the preferred medium for any type of protocol analysis as it provides a much larger array of tools to be used. However, this guide is aimed solely at beginners in packet analysis, most of which will be using Windows. As long as you don’t go into anything extremely deep then Windows can get the job done just fine.
Chris… looks good. One of the things I have the hardest time with is capture filter syntax versus display filter syntax; especially multiple condition filters (source, source+destination, source/destination/protocol, and so on). How about doing the next chapter on that?
Ethereal is now called Wireshark BTW and it’s URL is:
http://www.wireshark.org/
There is an article on NewsForge, but there’s no announcement or anything on the Ethereal site. It feels kind of dirty to me..
Dude, why would you use WireShark on an OS where the capture library is broken?
wow, you got digged. Congrats buddy! 🙂
No doubt, Ethereal is an excellent piece of networking software that could pick up packets within the network. What’s best is Ethereal is available in both Windows and Linux platform.
Ethereal is also available on OS X via Fink!
I “Digg” this story.
–Fiction is the only truth in a different light…
Nicely done. This is off-topic, but will you be getting into port mirroring anytime? I have a switched LAN, and need to be able to monitor traffic on several ports, but don’t have the option of your hub trick. Is this what mirroring is supposed to do – “copy” traffic from any particular port to your monitoring port? I just don’t know how to do this (or if my understanding of it is even correct to begin with).
I really needed this course very badly
Thanks again
Cheers for the time and effort, an interesting read.
Hey criss, just convert to be a book, this good stuff
It seems to be a useful tool, but I would like to know how much this WinPcap space requires and if it work on older versions of Windows as well. Good lick with your endeavor.
Hiii evrybody…..i want to analyse the packets coming to my network…i have to develop an application which analyses the tcp and ip headers without using any toolkits in windows…i have to write the code myself….can anyone plz help me with some links to the required resources(i am aware of OSI model and socket programming)..
Hi!!! everybody….i have to simulate etherial.means i have to make a simulator(for hardware)which provides data packet to ethereal.can any one help me for this.
Hey Chris …… Got a Question …. Jus Incase of Multiple PCs on Network , Instead of connecting the Sniffer(Laptop + Hub) behind Switch will it be best to connect befor the switch so that we can capture all the Traffic ?