The ARP protocol was designed out of necessity to facilitate to translation of addresses between the second and third layers of the OSI model. The second layer, or data-link layer, uses MAC addresses so that hardware devices can communicate to each other directly on a small scale. The third layer, or network layer, uses IP addresses (most commonly) to create large scalable networks that can communicate across the globe. The data link layer deals directly with devices connected together where as the network layer deals with devices that are directly connected AND indirectly connected. Each layer has its own addressing scheme, and they must work together in order to make network communications happen. For this very reason, ARP was created with RFC 826, “An Ethernet Address Resolution Protocol”.
How it Works
The basic idea behind ARP is for a machine to broadcast its IP address and MAC address to all of the clients in its broadcast domain in order to find out the IP address associated with a particular MAC address. Basically put, it looks like this:
Computer A – “Hey everybody, my IP address is XX.XX.XX.XX, and my MAC address is XX:XX:XX:XX:XX:XX. I need to send something to whoever has the IP address XX.XX.XX.XX, but I don’t know what their hardware address is. Will whoever has this IP address please respond back with their MAC address?
All of the other computers that receive the broadcast will simply ignore it, however, the one who does have the requested IP address will send its MAC address to Computer A. With this information in hand, the exchange of data can being.
Computer B – “Hey Computer A. I am who you are looking for with the IP address of XX.XX.XX.XX. My MAC address is XX:XX:XX:XX:XX:XX.
One of the best ways I’ve seen this concept described is through the limousine driver analogy. If you have ever flown, then chances are when you get off of a plane, you have seen a limo driver standing with a sign bearing someone’s last name. Here, the driver knows the name of the person he is picking up, but doesn’t know what they look like. The driver holds up the sign so that everyone can see it. All of the people getting off of the plane see the sign, and if it isn’t them, they simply ignore it. The person whose name is on the card however, sees it, approaches the driver, and identifies himself.
The Packet Level
Understanding the basic concept of ARP, we can take a look at some packets to see how it actually functions. Here we will step through the entire ARP process, start to finish. In this scenario Computer A needs to communicate with Computer B. you can download this sample capture file here.
Step 1: Computer A Generates Broadcasts an ARP Request Packet
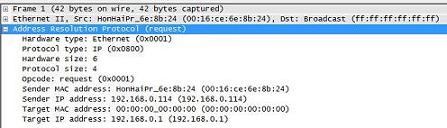
The packet details window of the first packet in the capture file is very straightforward. The computer at 192.168.0.114 needs to communicate with the computer at 192.168.0.1, but doesn’t know its MAC address. Notice that the target MAC address here is 00:00:00:00:00:00. This being the case, it sends a packet with the destination address ff:ff:ff:ff:ff:ff, in turn broadcasting that packet to everything on the current network segment. This is the basic ARP Request packet, as stated in the Opcode field.
Step 2: Computer B Receives the Request and Broadcasts an ARP Reply Packet
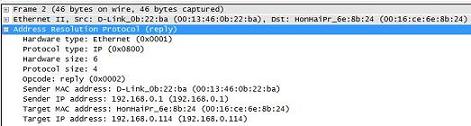
The second packet is our reply from 192.168.0.1. This device received the ARP Request in step one, and generated this reply addressed to 192.168.0.114. Notice that this reply contains the information that 192.168.0.114 needs to communicate properly. This is the sender MAC address in this second packet. You can tell immediately that this is an ARP reply by looking at the Opcode field.
Step 3: Communication Can Begin
Once the device at 192.168.0.114 receives the ARP Reply it can then take the MAC address of 192.168.0.1 and put it in its ARP table for future use. With this new information, ARP can successfully translate between layer two and layer three so that communication can move on to the physical medium.
Homework
ARP is by far one of the simpler protocols you will see, which is why I chose to use it for our first session of Packet School 201. Take a packet capture of your network and you are bound to see some ARP packets flying across the wire every now and again. See if you can pinpoint some of these and isolate the requests and replies. If you really want to learn a bit more about ARP, and how it can be used for malicious purposes, do some reading on ARP cache poisoning.
great!!! heard that there are 7 or more layers in network system can u pls explain few tks, any way great tutorial indepth and informative
god stuff, but while i ran a trace i had a whole bunch of arp requests but no reply’s
Where are the links to anything after 201 part 1 ?