Unfortunately, sniffing packets isn’t always as easy as plugging into an open port and firing up Wireshark. In fact, it is sometimes more difficult to place a packet sniffer on a network’s cabling system than it is to actually analyze the packets. In the grand ole days of packet analysis when everybody used hubs you could plug in and sniff all of the traffic on a network segment. As most of you know now however, the advent of switched networks prevents this. When you plug a sniffer in to a port on a switch, you can only see broadcast traffic and the traffic transmitted and received by your machine. Because of that we have had to come up with a few alternative techniques to getting the traffic we need.
The three most popular techniques for doing this are port mirroring, hubbing out, and ARP cache poisoning. The goal of this article is to give a brief overview of port mirroring and hubbing out, which are very commonly used, and then to give a detailed explanation of ARP cache poisoning, the least well known of the trio.
The Common Techniques
Port Mirroring is probably one of the easiest ways to capture the traffic you are looking for. Also called port spanning, this is a feature available on most managed network switches. This is configurable by accessing the command line or GUI management for the switch the target and sniffer systems are plugged in to and entering commands which mirror the traffic of one port to another. For instance, to capture the traffic of a device plugged in to port 3 on a switch, you could plug your sniffer into port 6 and enter a vendor specific mirroring command that mirrors port 3 to port 6.
Hubbing out is a technique in which you localize the target device and your analyzer system on the same network segment by plugging them directly in to a hub. In order to do this, all you need is an old hub and a few network cables. Simply go to the switch that the target computer resides on and unplug it from the network. Plug the targets network cable, along with the cable for your sniffer, into the hub, and then plug the hub into the network switch. This will put your sniffer and the target machine on the same broadcast domain and allow you to see all of the packets going to and from the target machine, as well as yours. Since this does involve a brief moment of connectivity loss, I do highly recommend letting the user of the target system know that you will be briefly disrupting their connectivity, especially if it is someone in management!
Poisoning the ARP Cache
The ARP protocol was designed out of necessity to facilitate to translation of addresses between the second and third layers of the OSI model. The second layer, or data-link layer, uses MAC addresses so that hardware devices can communicate to each other directly on a small scale. The third layer, or network layer, uses IP addresses (most commonly) to create large scalable networks that can communicate across the globe. The data link layer deals directly with devices connected together where as the network layer deals with devices that are directly connected AND indirectly connected. Each layer has its own addressing scheme, and they must work together in order to make network communications happen. For this very reason, ARP was created with RFC 826, “An Ethernet Address Resolution Protocol”. I’m not going to go into detail on the whole ARP process here, but I highly recommend reading my Packet School 201 write up on it here in order to better understand this process.
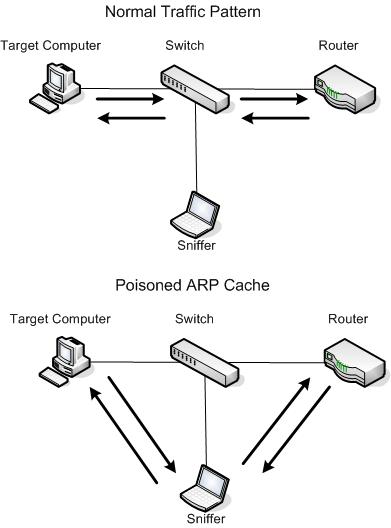
ARP cache poisoning is a more advanced form of tapping into the wire on a switched network. It is commonly used by hackers to send falsely addressed packets to client systems in order to intercept certain traffic or cause denial of service (DoS) attacks on a target, but ARP cache poisoning can still serve as a legitimate way to capture the packets of a target machine on a switched network.
ARP cache poisoning, sometimes referred to as ARP spoofing, is the process of sending ARP messages to an Ethernet switch or router with fake MAC (Layer 2) addresses in order to intercept the traffic of another computer.
Using Cain & Abel
When attempting to poison the ARP cache, the first step is to download the required tools and collect some necessary information. We’ll use the popular security tool Cain & Abel from Oxid.it (http://www.oxid.it). The installation is pretty straight forward so I won’t go through that here.
Once you have installed the Cain & Abel software, you need to collect some additional information including the IP addresses of your analyzer system, the remote system you wish to capture the traffic from, and the router that the remote system is downstream from.
When you first open Cain & Abel, you will notice a series of tabs near the top of the window. (ARP cache poisoning is only one of a variety of Cain & Abel’s features.) For our purposes, we’ll be working in the Sniffer tab. When you click this tab, you will see an empty table. In order to fill this table you will need to activate the program’s built-in sniffer and scan your network for hosts.
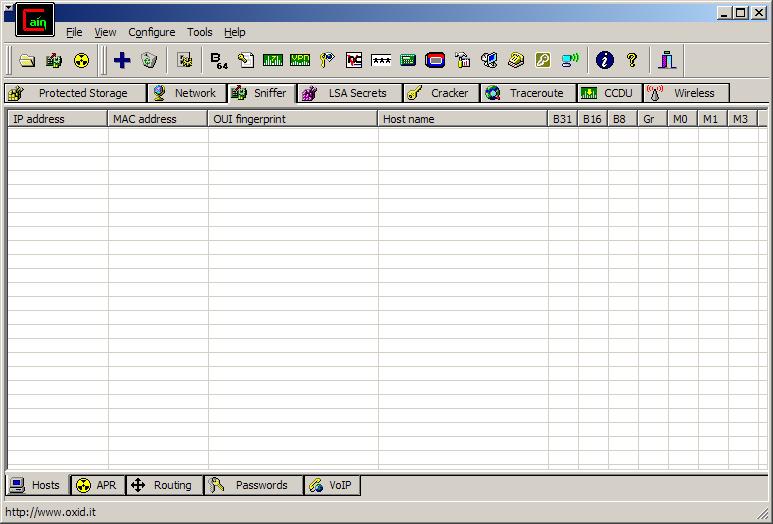
Click the second icon on the toolbar, which resembles a network card. The first time you do this you will be asked to select the interface you wish to sniff. This interface should be the one that is connected to the network you will be performing your ARP cache poisoning on. Once you’ve selected this interface, click OK to activate Cain & Abel’s built-in sniffer. To build a list of available hosts on your network, click the icon that resembles a plus (+) symbol, and click OK.
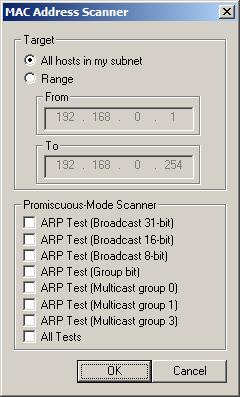
The once-empty grid should now be filled with a list of all the hosts on your attached network, along with their MAC addresses, IP addresses, and vendor identifying information. This is the list you will work from when setting up your ARP cache poisoning.
At the bottom of the program window, you will see a set of tabs that will take you to other windows under the Sniffer heading. Now that you have built your host list, you will be working from the APR tab. Switch to the APR window by clicking the tab.
Once in the APR window, you are presented with two empty tables: an upper and a lower one. Once you set them up, the upper table will show the devices involved in your ARP cache poisoning, and the lower table will show all communication between your poisoned machines.
Continue setting up your ARP poisoning by clicking the icon resembling the plus (+) symbol on the program’s standard toolbar. The window that appears has two selection columns side by side. On the left side, you will see a list of all available hosts on your network. Click the IP address of the target computer whose traffic you wish to sniff. This will result in the right window showing a list of all hosts in the network, omitting the target machine’s IP address. In the right window, click the IP address of the router that is directly upstream of the target machine, and click OK.
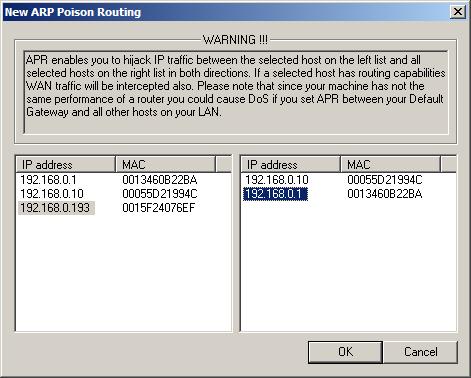
The IP addresses of both devices should now be listed in the upper table in the main application window. To complete the process, click the yellow-and-black radiation symbol on the standard toolbar. This will activate Cain & Abel’s ARP cache poisoning features and allow your analyzing system to be the middleman for all communications between the target system and its upstream router.
You can now fire up your packet sniffer and begin the analysis process. When you are finished capturing traffic, simply click the yellow-and-black radiation symbol again to stop ARP cache poisoning.
A Final Note
As a final note on ARP cache poisoning, you should be very aware of the roles of the systems you implement this process for. For instance, do not use this technique when the target device is something with very high network utilization, such as a fileserver with a 1Gbps link to the network (especially if your analyzer system only provides a 100Mbps link). When you perform this rerouting of traffic, all traffic transmitted and received by the target system must first go through your analyzer system, therefore making your analyzer the bottleneck in the communication process. This can create a DoS-type effect on the machine you are analyzing, which will result in degraded network performance and faulty analysis data.
That is all there really is to ARP cache poisoning. This technique has always proved significantly useful in packet analysis experience and I hope it does in yours as well.
Hi Chris,
This is great. I did this in my home network.
Nalin
Good work , small sized that makes it esy to follow.
Cheers,
Nicolas.
Thanks for this great article.
That was really easy to read, understand and implement, even for a beginner like me.
Tzvi
im getting this when i do the new arp part? “you need at least two hosts to set an arp entry” whats goin wrong?