Overwhelmed.
That’s how nearly everyone would describe their first experience with packet analysis. You fire up Wireshark and start a live capture or open a capture file you’ve found on someone’s blog and the number of packets quickly climbs from hundreds to thousands. This scenario scares most people away from packets completely, and it scared me for a bit too. Eventually, I developed techniques for dealing with large capture files and that brought me the confidence to keep learning.
This article is the first in a multi-part series that will share specific techniques for approaching large capture files.
[EDIT] You can find later parts of this series here:
In this first article, I’ll describe the mindset you should approach a large packet capture with. After that, I’ll describe the first technique: how to use Wireshark’s color coding feature to visually identify individual conversations.
Question-Driven Analysis
“A question well stated is a problem half solved.” – Charles Kettering
Every analysis and investigation focused class I teach revolves around this thesis, rooted in the scientific method. In packet analysis, you should always have a clear question in mind before you go about collecting packets. While packets may not lie, they do tell thousands of truths. Since you’re probably only looking for one of them, that’s a lot of truth to wade through.
When you make the decision to look at the packets, stop and ask yourself “why?” What are you looking for? Could it be:
- Evidence of malware on a system
- Confirmation that an IDS signature is a true positive
- Something indicating where the source of network latency is
- The nature of data transferred between two hosts
If you can define what question you’re trying to answer you should be able to figure out where to look and what analysis technique to use. Knowing these two things are the key to overcome being overwhelmed.
For example, consider an alert that a host on your network (10.10.1.75) communicated HTTP with a landing page (HTTP) associated with an exploit kit. To validate this alert, I want to know:
- What led 10.10.1.75 to the landing page?
- Was any malware downloaded?
These questions tell me what I need to know to go forward!
- Where should I look? This sequence occurs over HTTP so I’m interested in HTTP communication between 10.10.1.75 around the time identified in the alert.
- What technique should I use? I would use Wireshark to color code individual conversations to help me walk through the sequence of events. That’s a perfect segue because I’m going to describe color coding by conversation next.
You’ll learn to ask better questions as your career advances and you are exposed to a wider variety of investigation scenarios. Welcome those opportunities and force yourself to become more metacognitively aware by identifying the questions you’re trying to answer before diving into the data.
Now, let’s get to our first technique.
Wireshark Color Coding
One of the biggest hindrances to analyzing packets occurs because so many things are happening simultaneously. Even something as simple as visiting a website will spawn connections to dozens of other hosts, sometimes with multiple conversations occurring per host. We want network communication to be fast, which means all of these connections are occurring at the same time. That’s perfect for speed, but a nightmare for analysis. If you take a sample of twenty packets they might encompass a dozen or more individual conversations.

Figure 1: There are 7 different conversations represented here, but that’s not easy to pick apart visually
Following individual streams would be an easy solution, but sometimes you want to see multiple conversations on the screen at once while being able to visually discern which conversation individual packets belong to. It’s possible to determine that information from IP address and port numbers alone, but that’s slow and error-prone. Wireshark provides great functionality to take advantage of how our mind processes visual input.
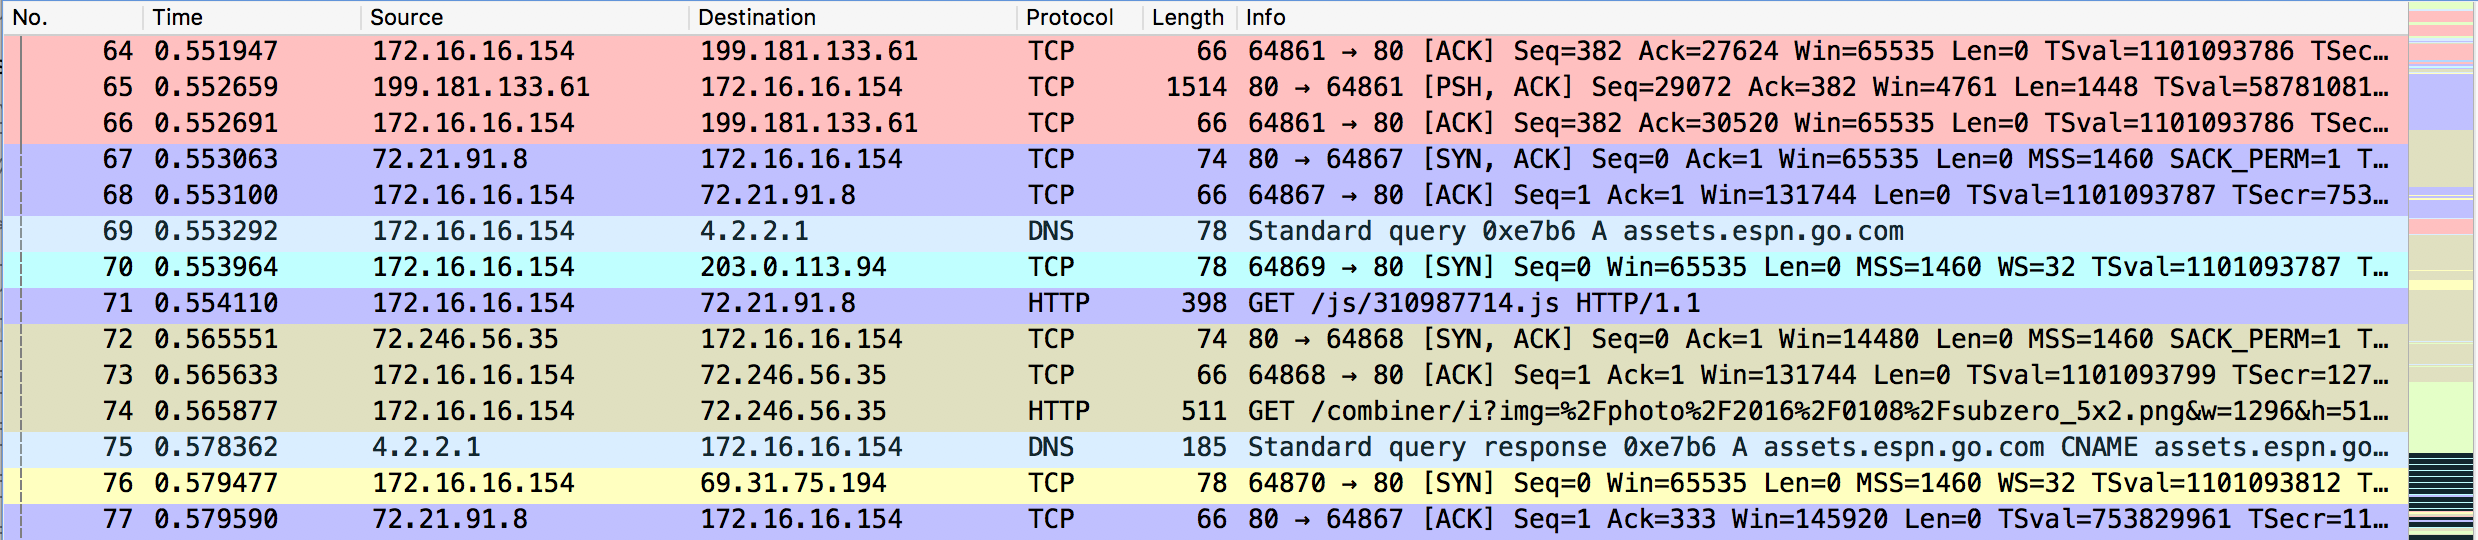
Figure 2: These are the same packets from Figure 1, but colored by conversation
NOTE: Did you know you can also colorize packets on the command line? As of v2.6 you can append the –color option to tshark and it will print out colorized packets too!
Wireshark color codes packets based on coloring rules. It comes with several of these built-in, but not everyone knows you can define your own custom coloring rules. To view the built-in coloring rules or to create your own, go to View > Coloring Rules.
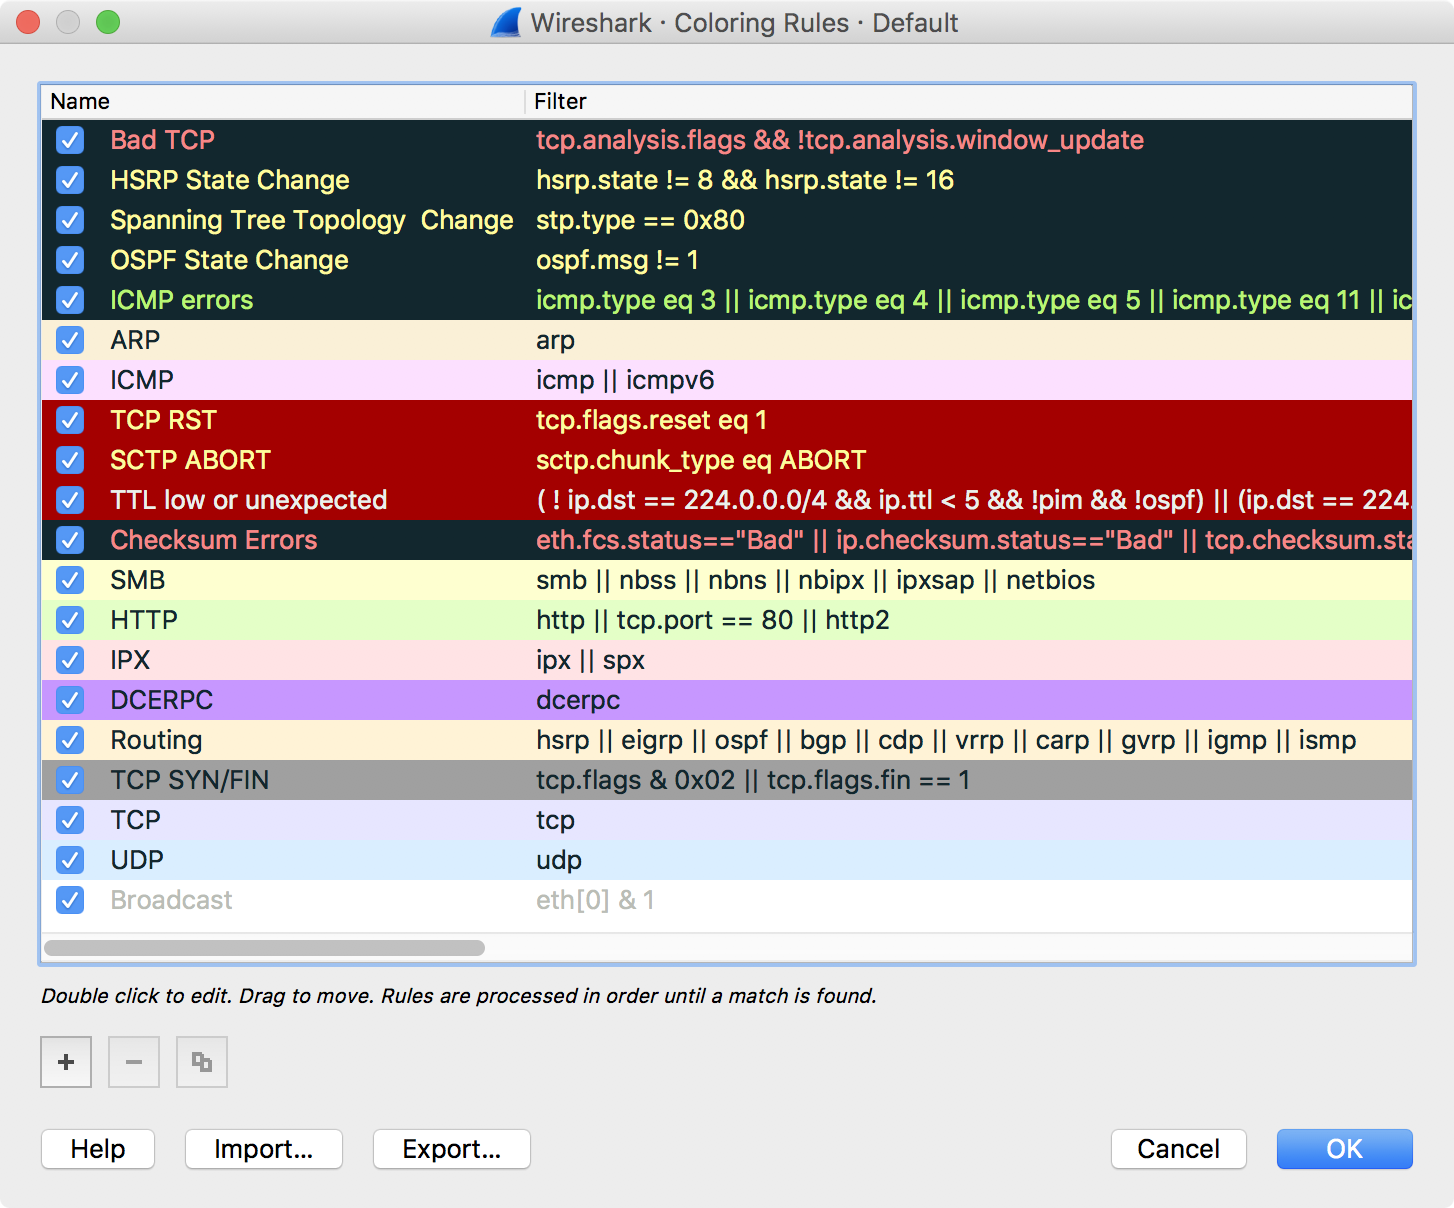 Figure 3: Wireshark Coloring Rules
The coloring rules are defined using the Wireshark display filter syntax based on individual protocol dissectors, among other things. These are the same filter expressions you plug into the filter bar at the top of the screen. If you know how to use filters in Wireshark, you already know how to define coloring rules.
With that said, I rarely ever write coloring rules manually. In most cases, I apply coloring rules to individual conversations. That’s even easier. Pick a packet in a capture file, right-click it, and hover over Colorize Conversation. The slide-out menu will reveal options that allow you to define the type of conversation (IPv4, IPv6, TCP, etc).
 Figure 4: Colorizing Packets by Conversation
How do you define the conversation?
In most cases, I choose to colorize conversations based on transport protocol (UDP/TCP). That allows me to visually differentiate individual communication streams between the same pair of hosts, which is more granular than defining conversations based on the IP address alone.
That’s important because each stream may have a unique cause or effect. Remember that everything in networking is stimulus and response. If you can identify one of those, you can work your way backward or forward towards the other and eventually arrive at the broader cause or effect. Most investigations involve inserting yourself into a specific moment in a timeline of events and methodically expanding your understanding of the sequence of events. Packet analysis is no different.
How do you know what conversations exist?
One approach involves simply scrolling through the packet capture and colorizing conversations as you get to them. Colorize the first packet in the capture and scroll until you find a packet that doesn’t have a unique color and repeat the process. I do this with capture files I know only have a small number of conversations, or in cases where I know the chain of events is sequential and I want to “walk” the capture file from beginning to end.
When those situations don’t apply, I leverage the Wireshark conversations window (Statistics > Conversations). It provides a tabular breakdown of conversations and you can right-click them directly to apply coloring.
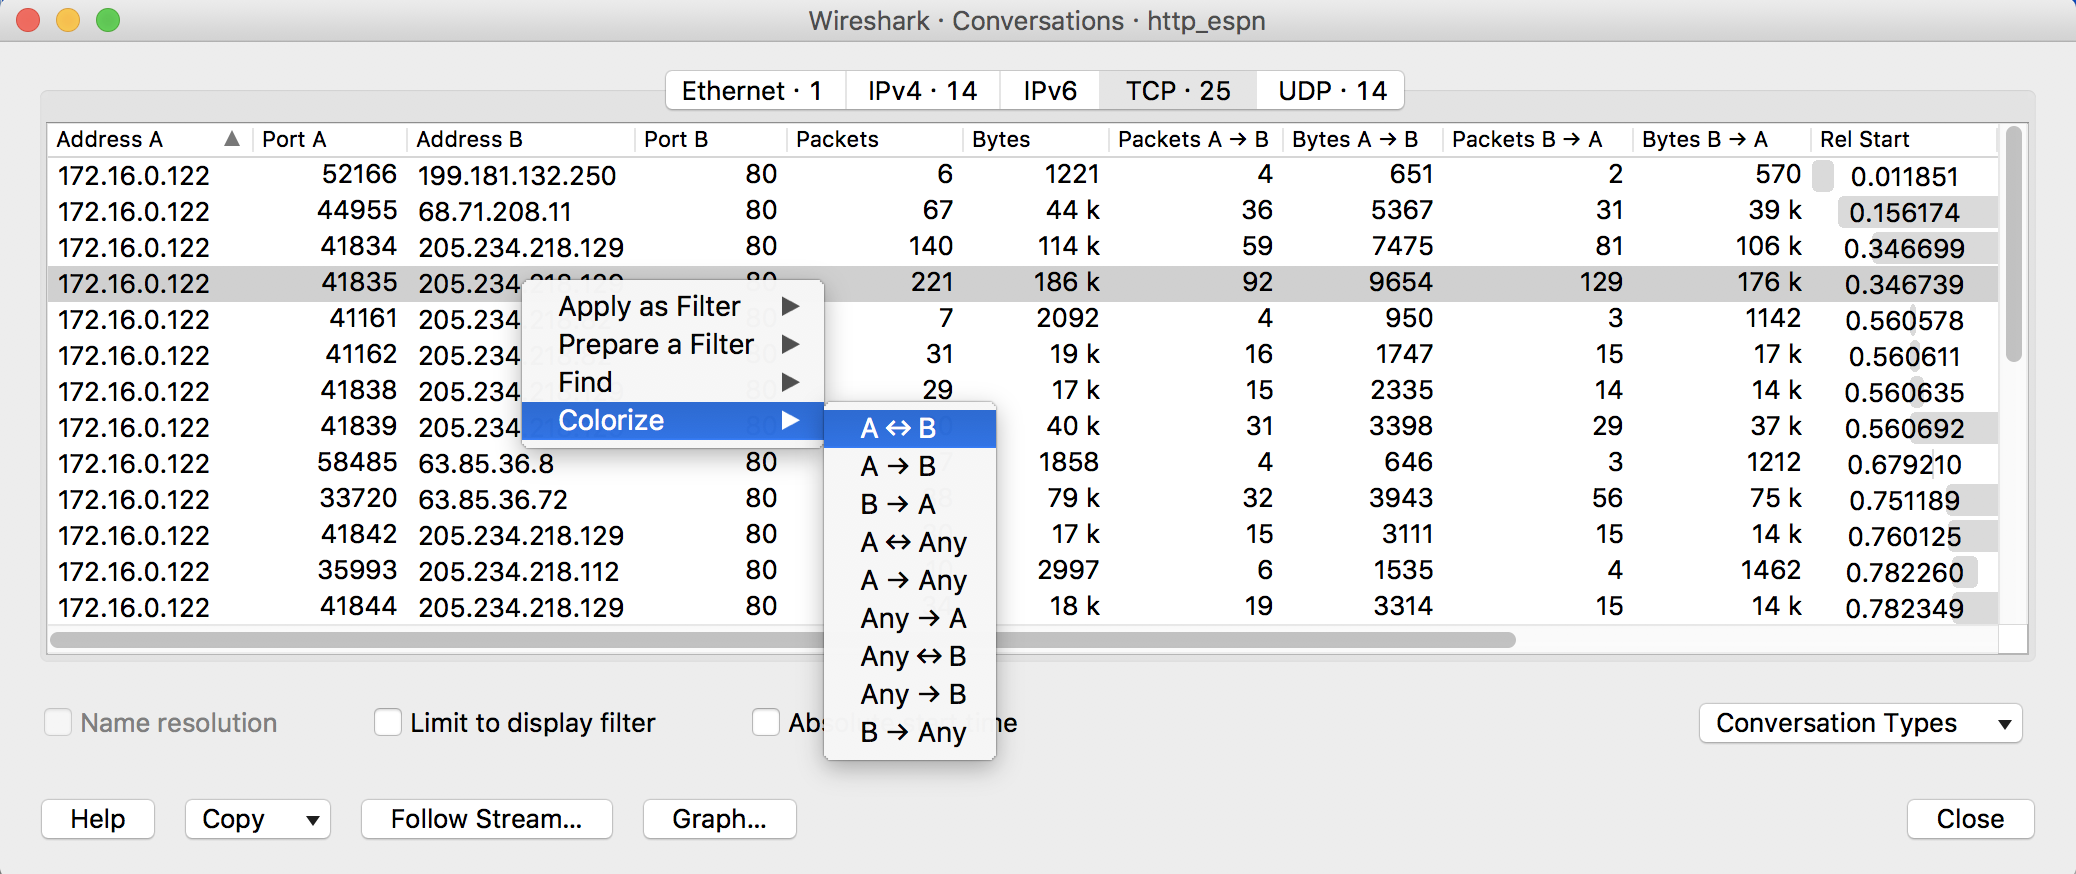
Figure 5: Colorizing packets from the Conversations window
You can colorize every conversation if it’s feasible, or identify the ones that may be interesting in larger capture files and start there.
When is colorizing conversations useful?
I use this technique very frequently, and mostly during scenarios where there are multiple hosts communicating at the same time, or there are multiple conversations between the same hosts that I need to differentiate. This is an ideal technique for analyzing stimulus and response.
I’ll also occasionally use this as a marker of what I understand and what I don’t. If something turns out benign I mark it in a shade of green. If it is unknown, yellow. If it’s malicious, red. This helps me identify what I’ve and what I have left to do, and also makes my conclusions apparent so that it’s easier to spot contradictions or things I’ve overlooked.
Can I save my coloring rules?
By default, colorizing a conversation doesn’t create a named rule in the dialog shown in Figure 3. These rules are just temporary. When you close the capture, you’ll lose that coloring. If you want to save your coloring rules, right-click on a packet and select Colorize Conversation. Hover to select how you define your conversation, but instead of selecting a color, select “New Coloring Rule”. This will bring up the Coloring Rules dialog and allow you to create a permanent named rule (not how it’s also showing you the filter expression the rule is based on). This will persist even after you close Wireshark.
A couple of tips:
- Name your coloring rules descriptively. If tied to a specific investigation I always prepend my coloring rules with a unique name or ID number to keep them together.
- Consider leveraging Wireshark profiles to tie coloring rules to specific investigations. This has the added benefit of allowing you to save custom filter expressions, views, and more into a single profile.
Conclusion
This article is the first in a series devoted to sharing techniques for dealing with large captures. The most important aspect of tackling overwhelming amounts of packets is to clearly define the question you want to answer. That will help you determine where you should look and the technique you’ll use to find an answer. Coloring packets by conversation is one of my favorite techniques so I chose to show it first. As this series progresses, you’ll learn a few other techniques.
—
If you like this article, you’ll really like my online packet analysis course. It’s packed with over 40 hours of training. You’ll learn how to decipher common protocols at the packet level, normal/abnormal stimulus and response, and more techniques for investigating anomalies. You’ll do this while going through hands-on exercises using Wireshark and command-line based packet analysis tools. You can learn more about the class here.